Purpose
To create and apply distributed loads
Steps
 Watch video - Improvements to Load Dialogs
To create distributed loads:
1. Click Component to open the Component Loading window. Then click Distributed Load to open the Distributed Load window.
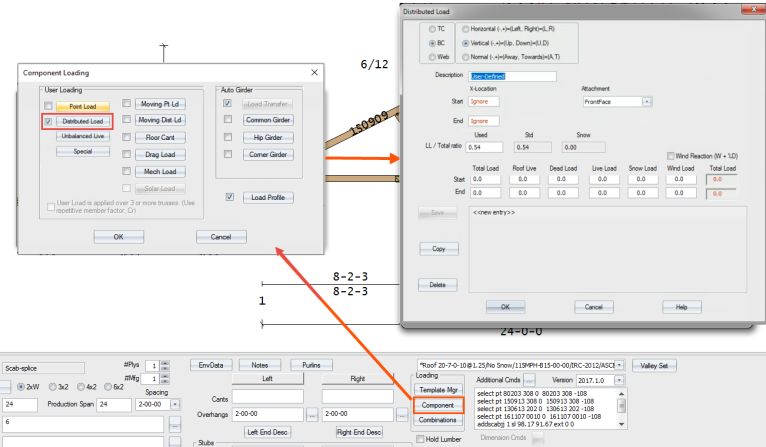
The check mark next to the Distributed Load button lets you enable/disable Distributed Loads.
2. In the Distributed Load window, define the following options. Options in red (Location and Total Load) are required:
Select a member (TC, BC, or Web) and direction (Horizontal, Vertical, Normal)
The Web option works for horizontal webs, and is applied by using Y-location. It works for both user loads and special loads.
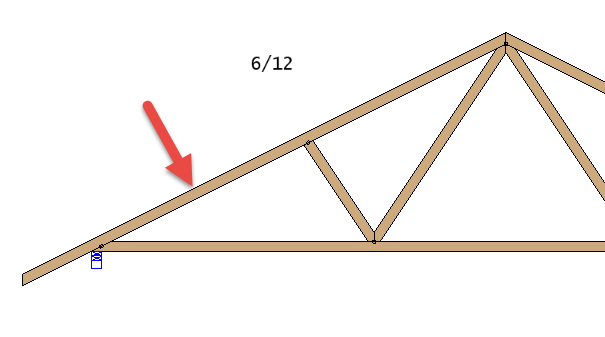
Normal is a load applied perpendicular to a member (not perpendicular to the truss, but perpendicular to a specific member, as shown below. Typically used for wind loading; seldom used.
Enter an optional description for the load
Attachment - location to attach load
LL/Total ratio - allows you to specify a Live Load to Total Load ratio to split the load into parts. The program defaults to the ratio suggested by the current Load Template; Std displays the default ratio. If you do not want to use the default ratio, enter a different number in the Used box.
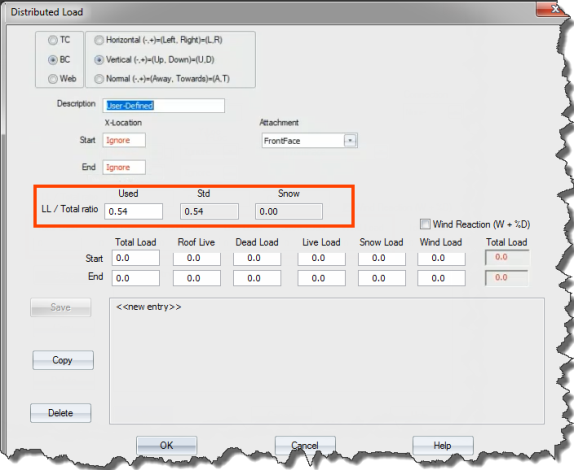
If snow load is enabled in the current Load Template, and the snow PSF is greater than the standard Live load PSF, the LL/Total ratio is calculated using the snow load PSF as "live" and the snow + dead loads as the total.
Wind Reaction - If this box is checked, you must enter a wind reaction. Truss Studio automatically takes this value and subtracts a 60% dead load to determine the actual wind part that needs to be applied, assuming any dead load is specified in the Dead Load box.
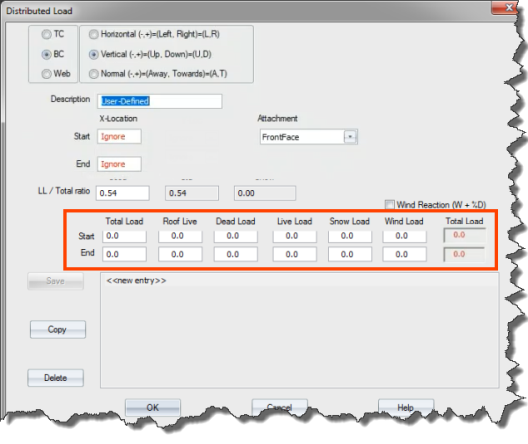
The following load boxes let you enter a Starting and Ending Total Load, split by the LL/Total ratio specified into Live and Dead components; alternatively, you can specify an individual load in each box. Depending on the truss and the Load Template used, all or some of the load boxes may need entries. Truss Studio takes an educated guess at completing the values in each load box. You can accept the program-supplied values or edit them. You can also supply the loads in the specific boxes directly, instead of using a Total Load entry.
Distributed loads have two load values, beginning and ending, expressed in plf (pounds per lineal foot). When the two plf values are different, the load is trapezoidal; otherwise, it is a uniform load.
- Total Load - enter total load in this box and press Tab. The remainder of the boxes are populated.
- Roof Live
- Dead Load
- Live Load
- Snow Load
- Wind Load
The values entered in Roof Live, Dead Load, Live Load, Snow Load, and Wind Load are saved to the truss file and can be edited later. Each type of load, with appropriate factors applied (as determined by Load Combinations), are automatically added to the appropriate loadcases using that type of load.
If you modify or enter loads into the individual load boxes, whatever is entered is the partial load. For example, you enter 400 in the Roof Live box, 200 in the Dead Load box, and -100 in the Wind Load box, that corresponds to exactly what is used for the Load Groups and Loadcases/Combinations, with the exception that all factors still need to apply, like 60% of the dead load for wind cases. It is not necessary to enter a value in all the boxes. If any one box has a value other than zero, that is acceptable, and that will be the only load applied to the truss. Each load box is combined concurrently with all program-generated loads of the same type. The Total Load box at the right end comprises the worst-case combination of “live” plus dead load.
3. Click Save to save the distributed load settings. Click OK to close the window. After you save a distributed load, you can use Copy to copy and edit the load case to create a new load case.
 Note: If you click OK without first clicking Save, you are prompted to save your changes before closing the dialog.
4. Click OK to close the Component Loading window.